


There’s something undeniably enchanting about tamagoyaki sushi-a delicate, sweet-savory roll of layered egg that embodies both simplicity and sophistication. This beloved Japanese delicacy, with its golden hues and gentle texture, is much more than just an omelette on rice; it’s a culinary art form that bridges tradition and technique. Whether you’re a sushi novice eager to expand your kitchen repertoire or a seasoned home chef aiming to perfect this iconic bite,mastering tamagoyaki sushi offers a rewarding challenge. In this step-by-step guide, we’ll crack open the secrets behind creating the perfect tamagoyaki, from selecting the right ingredients to achieving those signature, flawless layers. Get ready to roll up your sleeves and embark on a flavorful journey that transforms humble eggs into sushi elegance.
Selecting the Perfect Ingredients for Fluffy and Flavorful Tamagoyaki
Mastering Tamagoyaki Sushi begins with choosing the freshest, highest-quality ingredients to create that iconic balance of fluffy texture and delicate sweetness. Originating in Japan as a simple yet elegant rolled omelette, tamagoyaki’s charm lies in the harmony of its layers and subtle umami. I vividly recall my first encounter with tamagoyaki at a small Tokyo sushi bar – the warm, glossy folds instantly melted in my mouth, inspiring me to perfect this artful dish at home. To replicate that experience, hand-select eggs that are large, fresh, and preferably organic to achieve the fullest flavor and rich golden hue.Complement this foundation with a precise blend of Japanese seasonings like dashi, mirin, and a hint of sugar to capture the authentic sweetness without overpowering the egg’s natural taste.
Prep and Cook Time
- Preparation: 10 minutes
- Cooking: 15 minutes
- Total Time: 25 minutes
Yield
- Serves 4 as a sushi topping or standalone dish
Difficulty Level
- Medium – requires some rolling technique but beginner-friendly with practice
Ingredients
- 5 large fresh eggs,preferably organic
- 3 tablespoons dashi stock (homemade or instant)
- 1 tablespoon mirin (sweet Japanese rice wine)
- 2 teaspoons granulated sugar
- 1/2 teaspoon soy sauce (low sodium)
- 1 tablespoon vegetable or canola oil,for greasing
Techniques to Achieve the Ideal Texture and Sweetness Balance
To master tamagoyaki’s feather-light texture,whisk your eggs gently-not vigorously-to maintain air bubbles that create softness without excessive foam.Combine dashi, mirin, sugar, and soy sauce in a separate bowl and blend into the eggs evenly. This infusion layers subtle umami and gentle sweetness throughout each fold. Avoid adding too much sugar at once; gradually adjust it to suit taste, keeping the balance between sweet and savory pristine. Using a rectangular tamagoyaki pan allows even heat distribution,preventing browning that’s too dark or uneven cooking,which might toughen the egg. Temper your pan on medium-low heat to ensure each layer cooks softly yet firm enough to hold the next fold.
Step-by-Step Rolling Tips for a Picture-Perfect Tamagoyaki Layer
- Prepare your pan: Lightly oil the rectangular pan with a paper towel-excess oil can cause bubbling or uneven layers.
- Pour the first thin layer: Use just enough mixture to cover the pan’s base evenly. Let it cook gently until partially set but still slightly wet on top.
- Begin the roll: Using chopsticks or a silicone spatula, carefully lift one edge and roll towards the opposite side, forming the first cylinder.
- Oil and pour the next layer: Lightly grease the exposed pan, than pour the next thin layer beneath the rolled omelette, lifting the roll to let liquid flow underneath.
- Repeat: Once the new layer sets to the same delicate texture, roll again toward the other side. continue this technique until all egg mixture is used.
- Shape: Gently press the rolled omelette with the spatula to create clean edges and a tight, uniform shape.
- rest and slice: Let tamagoyaki cool briefly before slicing; this helps maintain clean layers with perfect definition.
Expert Serving Suggestions to Elevate Your Tamagoyaki Sushi Experience
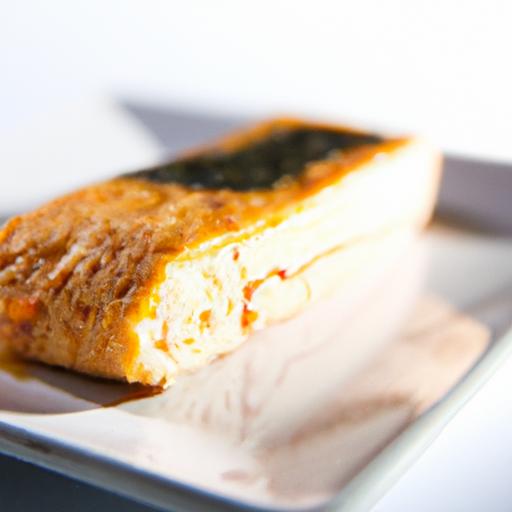
Serve your tamagoyaki sliced into 1/2-inch thick rectangles, with the glossy, layered pattern on full display. Pair it alongside succulent nigiri sushi or as part of a colorful bento box. Enhance the presentation with freshly grated daikon radish and a sprinkle of finely chopped green onions or shiso leaves for a refreshing contrast.A side dish of pickled ginger cleanses the palate, while a drizzle of soy or a dab of spicy wasabi elevates the sweet-salty balance. For a truly Instagram-worthy finish,arrange the slices atop sushi rice with a thin strip of nori,creating elegant tamagoyaki maki rolls. This versatile dish shines as both an appetizer and a centerpiece, inviting guests to savor the delicate artistry of egg perfection.
Bonus Tip: Store leftover tamagoyaki wrapped in plastic wrap at room temperature for up to 2 hours, or refrigerate for up to 24 hours, reheating gently to retain moisture.

| Nutrient | Per Serving |
|---|---|
| Calories | 140 kcal |
| protein | 9 g |
| Carbohydrates | 4 g |
| Fat | 10 g |
For more Japanese cooking tips, check out our Japanese Cooking Basics guide. To deepen your understanding of dashi’s role in Japanese cuisine, visit the authoritative Japanese Cooking 101.
Q&A
Q&A: Mastering tamagoyaki Sushi – Your Step-by-Step Egg Sushi Guide
Q1: What exactly is Tamagoyaki, and how does it differ from other types of sushi?
A: Tamagoyaki is a Japanese rolled omelette known for its subtly sweet, fluffy texture and delicate layers. Unlike conventional sushi featuring raw fish or seafood, Tamagoyaki sushi uses this expertly cooked egg as the star ingredient, offering a comforting, slightly sweet bite wrapped atop vinegared rice. It’s both a staple in bento boxes and an artful sushi style beloved across Japan.
Q2: why is Tamagoyaki considered a challenging dish to master?
A: Although it looks simple-a rolled omelette-Tamagoyaki demands precision. You must delicately balance the heat, timing, and amount of every egg layer to achieve its signature lightness and evenly cooked, thin folds. Overcook a layer or rush the rolling, and you risk tough, rubbery results or uneven textures. Mastery lies in patience,practice,and an understanding of subtle heat control.
Q3: What essential tools do I need to make Tamagoyaki at home?
A: The quintessential tool is a rectangular or square Tamagoyaki pan, which helps sculpt those perfect layered rolls. alongside this, a non-stick frying pan can work in a pinch, but a tamagoyaki pan ensures the classic shape. Other helpful items include chopsticks or a silicone spatula for gentle folding,a bowl for mixing your egg batter,and a bamboo sushi mat for shaping the sushi if desired.
Q4: How do I prepare the egg mixture for Tamagoyaki?
A: The egg mixture combines beaten eggs with a splash of dashi (Japanese broth) or water, soy sauce, mirin (sweet rice wine), and a pinch of sugar for subtle sweetness. This blend creates a savory-sweet balance that defines Tamagoyaki’s signature flavor.Whisk it thoroughly until perfectly smooth-no streaks-ensuring each layer cooks evenly.
Q5: Can you walk me through the actual folding technique?
A: Absolutely! Start by pouring a thin layer of egg mixture into the heated pan. As it begins to set but remains slightly wet on top, gently roll it from one end to the other using chopsticks or a spatula. Push the rolled omelette to one side of the pan, then coat the empty space with another thin layer of egg. Lift the roll slightly to let the raw egg flow beneath it, cook partially, and roll again onto the new layer. Repeat this layering and rolling until all the egg batter is used,creating a thick,multi-layered log.
Q6: How do I turn Tamagoyaki into sushi?
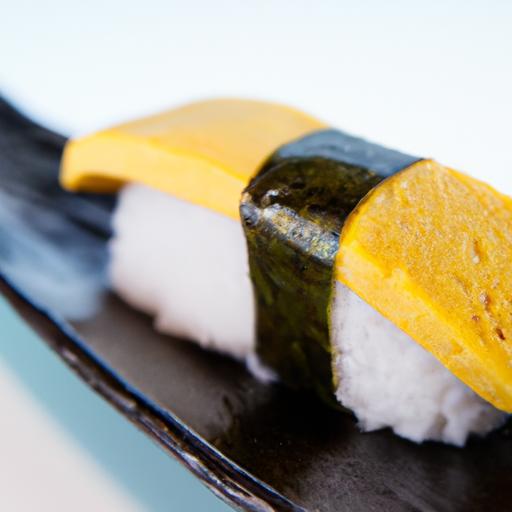
A: Once your Tamagoyaki roll has cooled to handle easily, slice it into even pieces. On small oval mounds of sushi rice, gently place a slice of Tamagoyaki and secure it with a thin strip of nori (seaweed) if desired. The result is an inviting sushi bite that balances the sweet-savory omelette with vinegared rice-a delightful harmony of texture and flavor.
Q7: What tips help ensure my Tamagoyaki is fluffy, not rubbery?
A: Avoid high heat; cooking gently prevents browning and toughening. Use fresh eggs and strain the mixture to remove chalaza strands and bubbles for silky smoothness. also, don’t overmix-just enough to combine ingredients-and cook in thin layers to allow each fold to cook thoroughly without drying out.
Q8: Are there creative twists to traditional Tamagoyaki that I can try?
A: Definitely! You can add finely chopped scallions, grated ginger, or even tiny shrimp for extra texture. For a modern fusion, try incorporating cheese or herbs into the egg layers for surprise bursts of flavor. Experiment with dashi substitutes like vegetable broth for a vegetarian version.
Q9: How should I serve Tamagoyaki sushi for an authentic experience?
A: Serve with a side of pickled ginger (gari), a dab of wasabi, and soy sauce for dipping. traditionally, it pairs beautifully with green tea or lightly chilled sake. Arrange your Tamagoyaki sushi pieces neatly on a wooden or ceramic platter to showcase the elegant layers.
Q10: Where can beginners go wrong, and how do they fix common mistakes?
A: The most common pitfalls include cooking at too high a temperature, which leads to browning and rubberiness, and rolling the egg too early or too late, causing breakage or uneven layers. If your layers separate, practice rolling slower and with a delicate touch. If the texture is off, adjust the seasoning or egg-to-liquid ratio.Remember: patience and practice turn novice attempts into savory success.
The Conclusion
as you fold the final layer of your tamagoyaki and slice into those perfect, golden rectangles, remember that mastering this delicate art is as much about patience and practice as it is about technique. Each roll carries the warmth of tradition and the promise of your growing skill, transforming simple eggs into a symphony of flavor and texture. Whether you’re crafting tamagoyaki as a sushi centerpiece or a breakfast treat, this step-by-step guide is your gateway to unlocking a timeless Japanese classic. So keep your pan ready, your whisk steady, and let every fold bring you closer to tamagoyaki mastery-as in the world of sushi, it’s the little layers that make all the difference.